Hi,
Please access the following link to download the documentation for the a basic application for Create and Update functionality in ADF.
https://docs.google.com/viewer?a=v&pid=explorer&chrome=true&srcid=0Bxyqfq4kqThYMDRkNjYzNzctNjgzOC00YWVkLTg3MWUtOGUyMDZiNjIzNWEz&hl=en_US
Thanks,
Gaurav

Friday, July 29
Tuesday, July 5
How to loop through the VO Rows in ADF
Hi,
In this example we will make use of a simple button to invoke a method in AM and in that method we will loop through the VO Rows. The same can be utilised in noumerous situations where you need to loop through the VO Rows as the page submits.
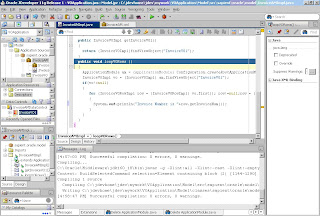
Step 1) Write a method loopVORows in Application Module
public void loopVORows ()
{
ApplicationModule am = (ApplicationModule) Configuration.createRootApplicationModule("sapient.oracle.model.InvoiceAM","InvoiceAMLocal");
InvoiceVOImpl vo = (InvoiceVOImpl) am.findViewObject("InvoiceVO1");
if(vo!=null)
{
for (InvoiceVORowImpl row = (InvoiceVORowImpl) vo.first(); row!=null;row = (InvoiceVORowImpl) vo.next())
{
System.out.println("Invoice Number is "+row.getInvoiceNum());
}
}
}
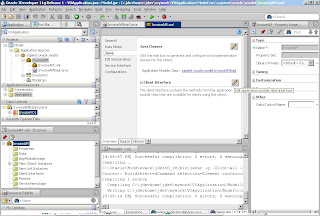
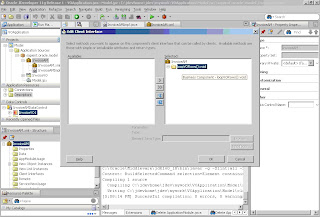
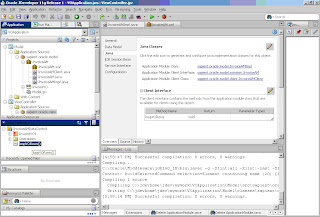
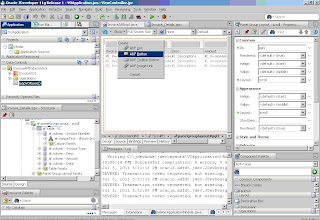
Step 2) Double Click on Application Module and under Client Interfaces shuttle the method defined above in the avaliable methods for client.
Step 3) Referesh the DataControl so as to reflect the new method and then drag and drop the new method from the datacontrols to the JSF page and create a ADF Button.
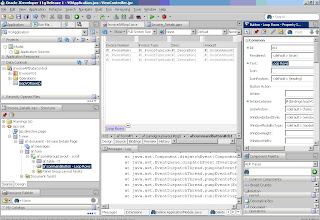
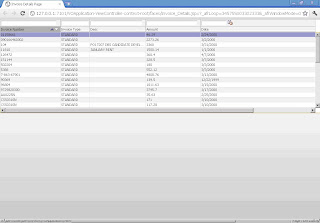
Step 4) Run the page. The output will look like :
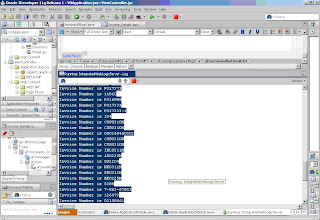
Step 6) Click on the button and in the jdev console you will see the SOP printed.
Thanks,
Gaurav
In this example we will make use of a simple button to invoke a method in AM and in that method we will loop through the VO Rows. The same can be utilised in noumerous situations where you need to loop through the VO Rows as the page submits.
Step 1) Write a method loopVORows in Application Module
public void loopVORows ()
{
ApplicationModule am = (ApplicationModule) Configuration.createRootApplicationModule("sapient.oracle.model.InvoiceAM","InvoiceAMLocal");
InvoiceVOImpl vo = (InvoiceVOImpl) am.findViewObject("InvoiceVO1");
if(vo!=null)
{
for (InvoiceVORowImpl row = (InvoiceVORowImpl) vo.first(); row!=null;row = (InvoiceVORowImpl) vo.next())
{
System.out.println("Invoice Number is "+row.getInvoiceNum());
}
}
}

Step 2) Double Click on Application Module and under Client Interfaces shuttle the method defined above in the avaliable methods for client.


Step 3) Referesh the DataControl so as to reflect the new method and then drag and drop the new method from the datacontrols to the JSF page and create a ADF Button.


Step 4) Run the page. The output will look like :

Step 6) Click on the button and in the jdev console you will see the SOP printed.

Thanks,
Gaurav
Friday, July 1
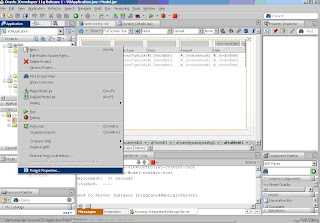
Time Zone Region not found : Error in ADF
Hi,
This has been very common error faced during development.
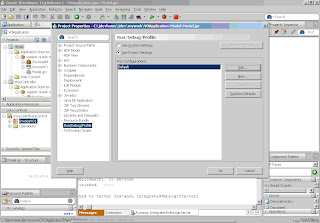
So, in order to get rid of this error, instead of setting the project properties and modifying the Debug/Run/Profile for each of the project we can set the Java options at default project properties so that it gets reflected for every project we create within jdev 11g and we would not need to edit the properties again n again for each project.
The steps to do that are :
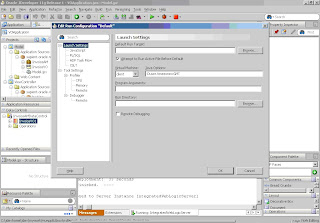
1) Click on Application at the Top Bar in jdev 11g and select Default Project Properties.
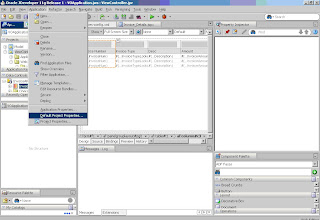
2) click on Edit and set the proper timezone.
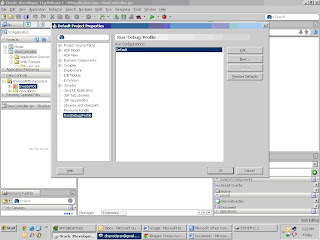
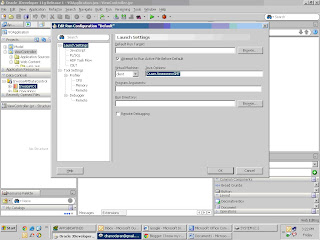
Don't forget to close and re open the jdev 11g to reflect the changes.
Thanks,
Gaurav
This has been very common error faced during development.
So, in order to get rid of this error, instead of setting the project properties and modifying the Debug/Run/Profile for each of the project we can set the Java options at default project properties so that it gets reflected for every project we create within jdev 11g and we would not need to edit the properties again n again for each project.
The steps to do that are :
1) Click on Application at the Top Bar in jdev 11g and select Default Project Properties.

2) click on Edit and set the proper timezone.


Don't forget to close and re open the jdev 11g to reflect the changes.
Thanks,
Gaurav
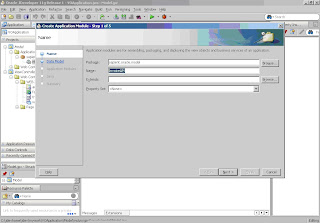
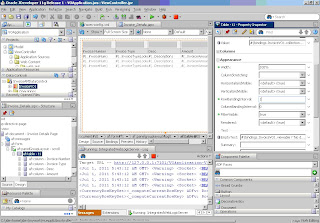
How to create simple VO based ADF Application using ADF Business Components.
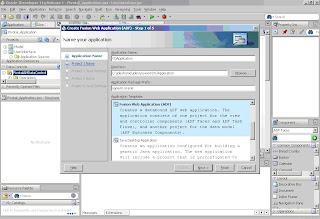
Step (1) Create a New Fusion Application including a project for Model and another for View Controller.
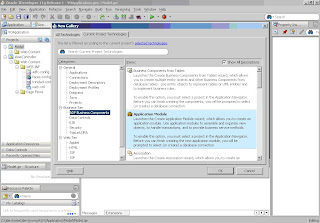
Step (2) Include the technologies needed for Model and View Controller Project both.
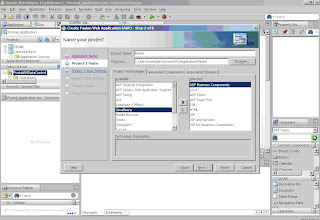
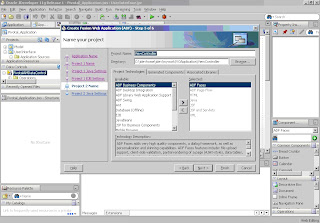
The jdeveloper will look like :
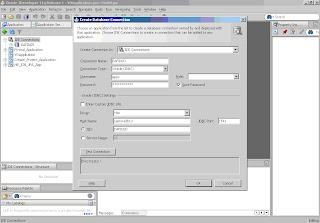
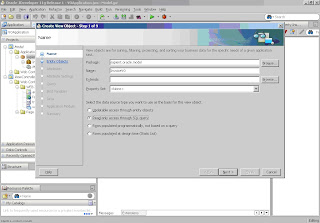
Step (3) Create a new database connection in IDE Connections.
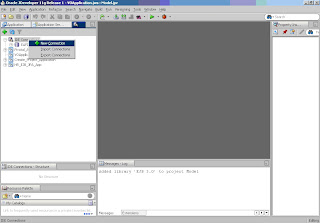
Step (4) Now Drag n Drop the connection to VO Application.
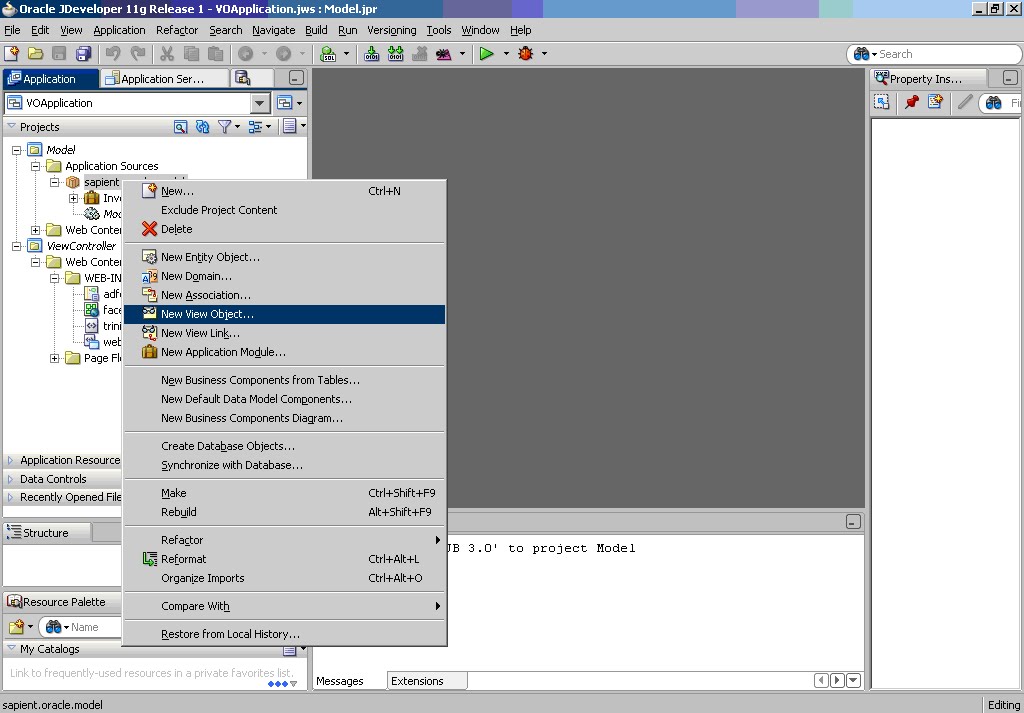
Step (5) Create Application Module and View Object.
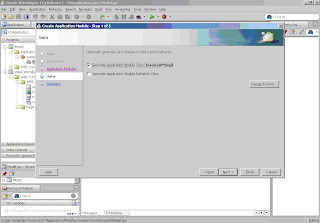

Step (6) Add the view object to the Application Module.
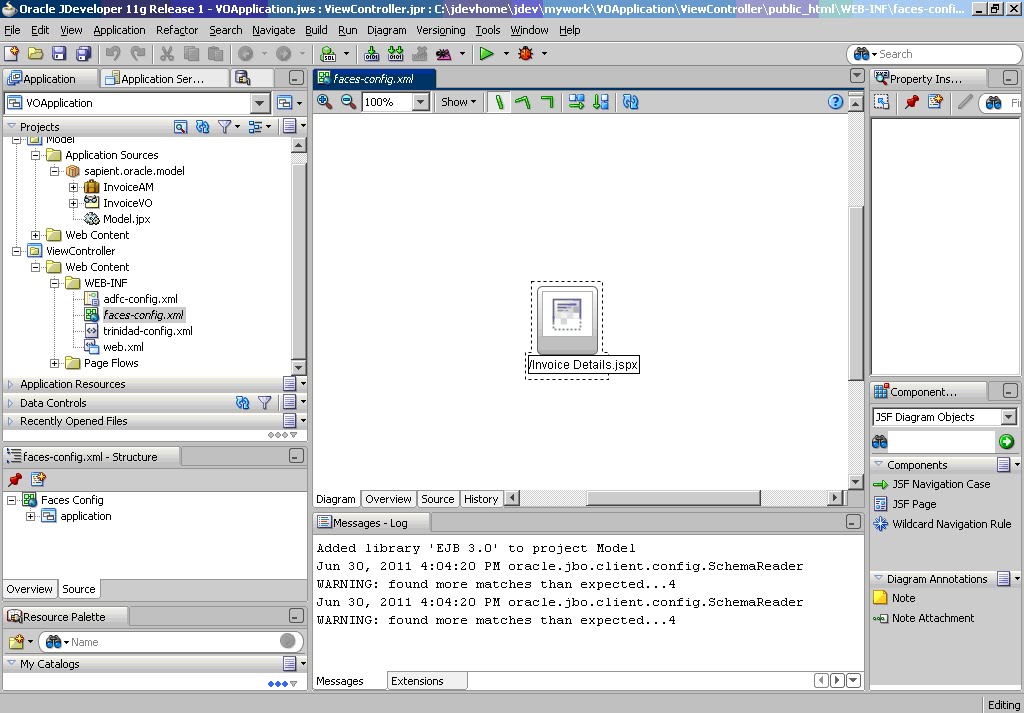
Step(7) Double click on faces-config.xml in View Controller project and add a JSF page to it.
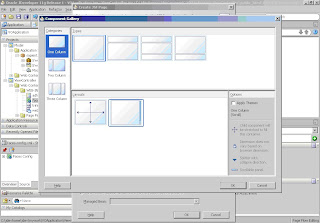
Step (8) Choose the layout and create a backing bean too.
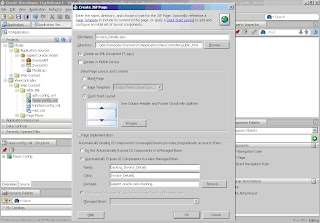
Step (9) Set the Title of the JSF page created.
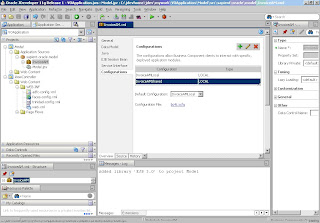
Step (10) Just refresh the DataControl Tab and then you see the VO Instance Name on in data control section.
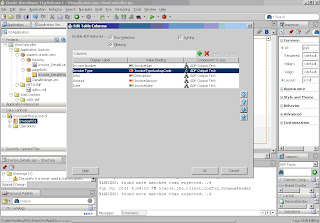
Step (11) Drag the InvoiceVO1 method in data control to the page and create a read only Table based on that and set the table properties.
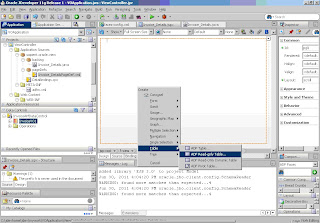
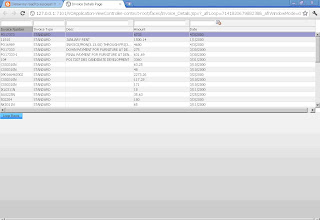
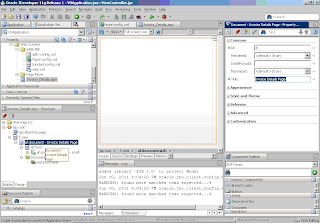
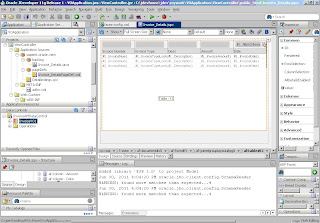
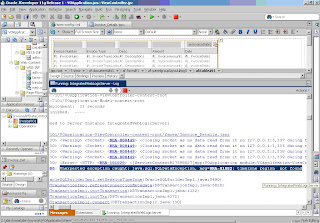
Step (12) The jdeveloper will look like as shown below and run the page.

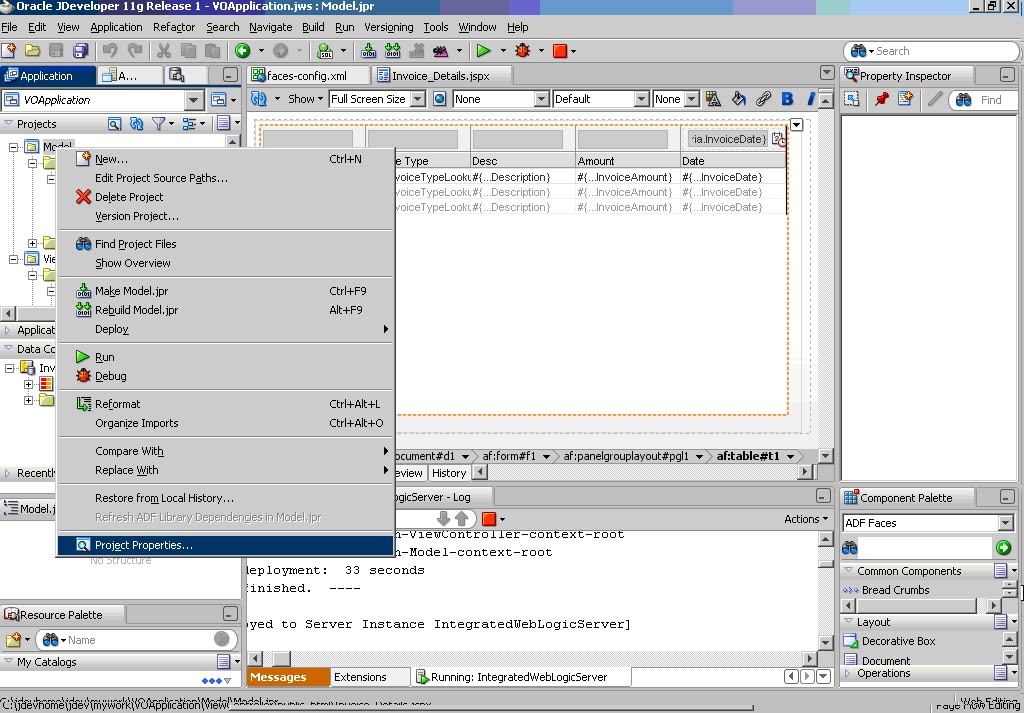
Step (13) If you face Time Zone region not found error then right click on both Model and View Controller Projects and go to project properties -->Run/Debug/Profile -->Click on edit and under Java Options add the time zone of the web logic server.
Close the jdeveloper and re-run the application.
Thanks,
Gaurav

Step (2) Include the technologies needed for Model and View Controller Project both.


The jdeveloper will look like :

Step (3) Create a new database connection in IDE Connections.


Step (4) Now Drag n Drop the connection to VO Application.

Step (5) Create Application Module and View Object.


Step (6) Add the view object to the Application Module.

Step(7) Double click on faces-config.xml in View Controller project and add a JSF page to it.
Step (8) Choose the layout and create a backing bean too.


Step (9) Set the Title of the JSF page created.

Step (10) Just refresh the DataControl Tab and then you see the VO Instance Name on in data control section.

Step (11) Drag the InvoiceVO1 method in data control to the page and create a read only Table based on that and set the table properties.


Step (12) The jdeveloper will look like as shown below and run the page.


Step (13) If you face Time Zone region not found error then right click on both Model and View Controller Projects and go to project properties -->Run/Debug/Profile -->Click on edit and under Java Options add the time zone of the web logic server.
Close the jdeveloper and re-run the application.


Thanks,
Gaurav
Saturday, June 18
SOP's and Compilation Errors in jsp in iStore
Hi,
iStore is totally a JTF based module which works on the jsp concept.
Now when a jsp gets compiled in iStore at run time, where are the compilation errors stored? How do we get to know that what is the compilation erros occured??
Also, if we put SOP's (System.out.println) in jsp where we can see the output??
Answer to this :
The sop's you write in jsps's gets printed in
ORACLE_HOME/Apache/jserv/logs/jserv.log
jsp compilation erros are stored in ssame dir with name as mod_jserv.log
We need jserv logging to be enabled to generate logs.
Steps to enable jserv logging is :
Enable Apache and Jserv debug to match the above debug to validate the above success/debug messages at Apache end
Refer : Basic Apache/mod_jserv Troubleshooting with Hello.class (Doc ID 230688.1)
Thanks,
Gaurav
How to enable logging in iStore
Hi,
Reference :ORACLE CORPORATION http://www.oracle.com How to generate Debug Log Files for Oracle iStore? (Note:207262.1)
I. Purpose To generate debug log files for Oracle iStore. This feature creates separate user log files for both the Java Layer (middle tier) and PL/SQL (database tier) layers.
II. Initial Setup Requirements The following steps are required to be able to log the debug information.
1. Ensure the Logging Parameters in your jserv.properties file are set:
A.
Go to the $APACHE_TOP/Jserv/etc directory and open the jserv.properties file
b. You should have two lines with the following parameters:
wrapper.bin.parameters=-Dframework.Logging.system.filename=/&directory/fwsys.log
wrapper.bin.parameters=-Dservice.Logging.common.filename=/&directory/ibe.log
NOTE: - Replace /&directory/ with a valid directory on your server and make sure it has the proper permissions. - This will not be the name of the log file generated from iStore, see below for the exact name of the log file.
2. Ensure the Debug Properties are turned on for the application:
A. Login to jtflogin.jsp as sysadmin user
B. Navigate to Settings -- System -- Advanced
C. Choose JTF from the dropdown list
D. Verify the following properties are set: framework.Logging.system.filename : fwsys_jtf_log framework.Logging.system.level : debug service.Logging.common.filename : jtf_log service.Logging.common.level : debug service.Logging.common.mode : file
NOTE: - The two *.filename properties are to be set to a name of file, do not enter a directory. - The directory is defined from the parameters set in the jserv.properties. - This will not be the name of the log file generated from iStore, see below for the exact name of the log file.
3. Set the "OM: Debug Log Directory" system profile: Set the Oracle Order Management profile "OM: Debug Log Directory" at the site level to a directory that is writable by the database server. The profile value must be one of the directories listed in the utl_file_dir parameter.
Notes: - To find the utl_file_dir value set, the following query may be executed: select value from v$parameter where name = 'utl_file_dir' - Refer to Note 204016.1 for instructions on updating the utl_file_dir in the init.ora file.
III. Steps to Generate Debug Log Files from iStore
1. Set the Oracle Order Management profile "OM: Debug Level" to 5 at the Site level.
2. If the problem needs Pricing information: please check the "QP: Debug" profile. - If the profile has 'No' and 'Yes' as values, set the profile to 'Yes' at the user level. - If the profile has the 3 values regarding the Request Viewer, set the profile to 'Request Viewer Off'. At this point, the Pricing Debug information will be generated when the "OM: Debug Level" profile is set.
3. If the problem needs the Tax information, the following profiles should also be set: "Tax: Debug File Directory" to the same value as the "OM: Debug Log Directory" profile. "Tax: Debug Flag" to Yes at the user level.
4. If the problem needs the ATP information, the following steps need to be followed: - Set the "MSC: ATP Debug Mode" profile to 'Debug Only' at the site level. - Make sure user level is set to NULL. - A session-* log file will be generated in the 'utl_file_dir' directory.
5. Set the "IBE : Enable Debug" and "ASO : Enable ASO Debug" profiles to Yes at the user level. Both profiles are needed to be set as iStore will call some Order Capture API's.
6. Bounce the apache server to make sure you have a new jserv connection and a new log file is started.
7. Open a new browser window and replicate the issue in iStore
8. Unset the profiles to stop the debugging.
IV. Where are the iStore Debug Log files generated?
1. The iStore pl/sql log file will be generated in the directory (located in the Database Tier) specified in the Order Management 'OM: Debug Log Directory' System Profile and has the syntax of IBE_[username].log
2. The iStore java layer log file will be generated in the directory specified in the 'Dframework.Logging.system.filename' JVM parameter of your Middle Tier (See section II step 1) and has the syntax of IBE_[username]_[generated_id].log Note: Based on the action being done, there might also be a Quoting debug log file generated in the same directory which will have the following syntax: QOT[username]_[generated_id].log Make sure to upload the iStore debug log file and the Quoting if one was generated.
V. Generating Configurator Log Files from iStore If Configurator is involved in the replication steps, some configurator log files can (and should) be obtained for further debugging. For information on how to collect Configurator please refer to Note:313695.1 Note: Other additional notes regarding configurator logging: Note:295930.1 'How to turn off cz logging for the cz*.* logs' , Note:293455.1 (Section: Logging Through the CIO) 'Oracle Configurator Documentation Supplement for Release 11i10 Cumulative Update #1'
VI. Generating Debug Log Files as the guest user To generate the iStore debug log files while you are the guest user, you will just need to append '?&log=t' (without the single quotes) to the end of the URL before the step you want to debug while you are the guest user. There is no need to set all profiles from section III. For example: http://[host]:[port]/OA_HTML/[jsp]?&log=t This will generate the pl/sql and java layer log files for any actions done in that browser after that. You do not have to append the parameter again for that session. Once you close the browser, it stops the debugging. If you start a new browser and append the parameter again, it starts a new set of logs. The logs will be generated the same way for the guest user:
1. The pl/sql file name will have a syntax of "IBE_[guest_partyname].log" and be generated in the directory specified in the "OM: Debug Log Directory" system profile.
2. The java layer file name will have a syntax of "IBE_[guest_partyname]_pgenerated_id].log" and be generated in the directory specified in the 'Dframework.Logging.system.filename' parameter of the jserv.properties.
VII. Generating Debug Log File from the iStore Administration UI Starting from iStore version 11.5.9 (11i.IBE.O),
a debug log file can be generated from the iStore Site Administration User Interface. Login to the Application Forms and set the following System Profiles at the user level to the following values: FND: Debug Log Enabled : Yes FND: Debug Log Module : % FND: Debug Log Level : Statement FND: Debug Log Filename : [path]/ibe_admin.log Note: Replace [path] with the value entered for the "OM: Debug Log Directory" profile. The log file will be called ibe_admin.log and be located in the directory specified in the path entered in the 'FND: Debug Log Filename' profile. Known issues: If you are on 11.5.8 or prior and have applied the 11i.IBE.O patchset, the following patches are required for the debug log file to generate. - Patch 2724762 (WAPSERVLET DISABLES AFLOG) - Patch 2581148 (APPSLOG FAILS TO LOG MESSAGES IN ONE SITUATION) Note: Patch 2581148 is NOT included in Oracle Applications version 11.5.8.
Thanks,
Gaurav
How to export the multiple VO data to excel programatically
Hi,
A lot of times we have the requirement to export table data in excel. We have a standard OAF item called Export Button to do the same but, one export button is attached to one View Object Instance only and it only exports attributes which are shown on to the table region not the hidden attributes.
So, how should we export data from multiple VO's at single button click??
Well, here is the code :
1) Create a submit button on page say : "download"
2) We have multiple VO's for exporting the data
xxcnspDetailsVO1
xxcnRepositoryVO1
xxcntrCallVO1
3) Handle the download button click on PFR of CO as :
if(pageContext.getParameter("download")!=null)
{
String dept_name = null;
String emp_name = null;
String site_name = null;
OAViewObject vo = (OAViewObject)am.findViewObject("xxcnspDetailsVO1");
if(vo!=null)
{
dept_name = (String)vo.first().getAttribute("DeptName");
emp_name = (String)vo.first().getAttribute("Name");
}
OAViewObject repvo = (OAViewObject)am.findViewObject("xxcnRepositoryVO1");
if(vo!=null)
{
site_name = (String)repvo.first().getAttribute("Name");
}
OAViewObject trCallVO = (OAViewObject)am.findViewObject("xxcntrCallVO1");
try
{
HttpServletResponse response = (HttpServletResponse) pageContext.getRenderingContext().getServletResponse();
response.setContentType("application/text");
response.setHeader("Content-Disposition","attachment; filename=" + "Employee Trouble Call Report" + ".csv");
PrintWriter pw = null;
pw = response.getWriter();
pw.write("Department :");
pw.write(",");
if(dept_name !=null) // for null handling in the code
{
pw.write(dept_name);
}
else
{
pw.write(" ");
}
pw.write("\n"); // for going to next line
pw.write("Team :");
pw.write(","); // for going to next cell in excel
pw.write(site_name);
pw.write("\n");
emp_name = emp_name.replaceAll(",",".");
pw.write("Employee :");
pw.write(",");
pw.write(emp_name);
pw.write("\n");
pw.write("\n");
pw.write("\n");
//Writing the headers
pw.write("Customer Number");
pw.write(",");
pw.write("Account");
pw.write(",");
pw.write("Install Repeat Date");
pw.write(",");
pw.write("Work Order Number");
pw.write(",");
pw.write("Work Order Type");
pw.write(",");
pw.write("Problem Code");
pw.write(",");
pw.write("Finding Code");
pw.write("\n");
// getting table data
if(trCallVO!=null)
{
for(xxcntrCallVORowImpl row = (xxcntrCallVORowImpl)trCallVO.first();row!=null;row =(xxcntrCallVORowImpl)trCallVO.next())
{
if(row.getCustNumber()!=null)
{
pw.write(row.getCustNumber());
}
else
{
pw.write(" ");
}
pw.write(",");
if(row.getAcct()!=null)
{
pw.write(row.getAcct());
}
else
{
pw.write(" ");
}
pw.write(",");
if(row.getInstRpDate()!=null)
{
pw.write(row.getInstRpDate());
}
else
{
pw.write(" ");
}
pw.write(",");
if(row.getWoNum()!=null)
{
pw.write(row.getWoNum().intValue());
}
else
{
pw.write(" ");
}
pw.write(",");
if(row.getWoNum()!=null)
{
pw.write(row.getWoNum().intValue());
}
else
{
pw.write(" ");
}
pw.write(",");
if(row.getOrdType()!=null)
{
pw.write(row.getOrdType());
}
else
{
pw.write(" ");
}
pw.write(",");
if(row.getProbCode()!=null)
{
pw.write(row.getProbCode());
}
else
{
pw.write(" ");
}
pw.write(",");
if(row.getFindingCode()!=null)
{
pw.write(row.getFindingCode());
}
else
{
pw.write(" ");
}
pw.write("\n");
pw.write(" ");
pw.write(",");
pw.write(" ");
pw.write(",");
if(row.getInvDate()!=null)
{
pw.write(row.getInvDate());
}
else
{
pw.write(" ");
}
pw.write(",");
if(row.getOrderNumber()!=null)
{
pw.write(row.getOrderNumber().intValue());
}
else
{
pw.write(" ");
}
pw.write(",");
if(row.getAttribute74()!=null)
{
pw.write(row.getAttribute74());
}
else
{
pw.write(" ");
}
pw.write(",");
if(row.getAttr28()!=null)
{
pw.write(row.getAttr28());
}
else
{
pw.write(" ");
}
pw.write(",");
if(row.getAttr27()!=null)
{
pw.write(row.getAttr27());
}
else
{
pw.write(" ");
}
pw.write("\n");
}
}
pw.write(" ");
pageContext.setDocumentRendered(false); //mandatory
pw.flush(); //exporting data
pw.close();
}
catch(Exception e)
{
e.printStackTrace();
}
}
This way you can include as many VO's as you want.
Thanks,
Gaurav
Monday, May 30
Limitations in embedding OAF regions in Workflow Notifications
Hi,
We can embed an OAF region into an existing workflow notification using the following steps:
1) Create a StandAlone Region in jdev and associate an AM and View Object to it.
2) import the region and create a form function for it using System Administrator Resp.
3) Take an attribute of type Document and in the value write :
JSP:/OA_HTML/OA.jsp?OAFunc=FunctName
4) Call this attribute in message body using Token "&ATTR_NAME".
This will show the OAF region on to notification if in your notification body all the attrbutes reffered by Token & refers to OAF regions. But, in case the notification body also contains Text Attributes then you will get error on the screen that.
&ATTR_TEXT does not refer to an OAF Region.
To avoid this, we can dynamically create the OAF region lets say a table region through PL/SQL and call that Pl/SQL Package in a document type attribute in the WorkFlow Notification Body. The Steps involved are:
1) Create an activity in Workflow Process calling the Package.
for ex : PA_CANDIDATE_CUSTOM_EXTN.GET_FEEDBACK(document_id in varchar2,
display_type in varchar2,
document in out varchar2,
document_type in out varchar2)
The Document ID is the unique identifier being used. This is the parameter which you want to pass from the notification into table region to show details related to this only. Suppose in this case we are passing the person_name to get his records.
CURSOR feedback_cur (P_PERSON_NAME IN VARCHAR2) IS
SELECT a.person_id,
a.effective_start_date,
a.effective_end_date
FROM per_all_people_f
WHERE full_name = P_PERSON_NAME;
We want the output of the above query to get displayed on Notification as table region.
Now in the procedure : GET_FEEDBACK write as in the image.

2) Create an attribute of type document and in the value call the above package passing the document id and use this attribute in notification body
using token &ATTR_NAME
value : plsql:PA_CANDIDATE_CUSTOM_EXTN.GET_FEEDBACK/&PERSON_NAME
Thanks,
Gaurav
Friday, January 21
How to send HTML based e-mail notification using PL/SQL
Hi,
The following code illustrates an example to send html based e-mail notification through PL/SQL.
The Declare Block:
declare
begin
sendmail.send ('eafin20@norelay.com',
'eafin20@norelay.com',
'Subject: Testing',
'Hello '
|| ',
|| Please find attached the '
|| ' Code. '
|| 'This file has been uploaded to '
|| 'BlogSpot.Com'
);
end;
The Package :
Note : You would have to specify the SMTP server as per the instance in :
utl_smtp.open_connection('10.210.42.82',25)
utl_smtp.helo(c, '10.210.42.82')
create or replace PACKAGE sendmail IS
procedure common (p_sender varchar2,
p_recipient varchar2,
p_subject varchar2,
c out utl_smtp.connection);
procedure send (p_sender varchar2,
p_recipient varchar2,
p_subject varchar2,
p_body varchar2 default null);
end sendmail;
create or replace PACKAGE BODY sendmail IS
procedure common (p_sender varchar2,
p_recipient varchar2,
p_subject varchar2,
c out utl_smtp.connection)
is v_recipient varchar2(1000);
begin
c := utl_smtp.open_connection('10.210.42.82',25);--make connection to smtp
utl_smtp.helo(c, '10.210.42.82'); --identify the domain of the sender
utl_smtp.mail(c, p_sender); --start a mail, specify the sender
utl_smtp.rcpt(c, p_recipient); --identify recipient
utl_smtp.open_data(c); --start the mail body
utl_smtp.write_data(c, 'From: ' || p_sender || utl_tcp.crlf);
utl_smtp.write_data(c, 'To: ' || p_recipient || utl_tcp.crlf);
utl_smtp.write_data(c, 'Subject: ' || p_subject || utl_tcp.crlf);
exception when utl_smtp.transient_error or utl_smtp.permanent_error then
utl_smtp.quit(c);
raise;
when others then
raise;
end common;
procedure send (p_sender varchar2,
p_recipient varchar2,
p_subject varchar2,
p_body varchar2 default null)
is c utl_smtp.connection;
begin
common(p_sender, p_recipient, p_subject, c);
utl_smtp.write_data(c, 'Content-Type: text/html' || utl_tcp.crlf);
utl_smtp.write_data(c, utl_tcp.crlf || p_body);
utl_smtp.close_data(c);
utl_smtp.quit(c);
exception when utl_smtp.transient_error or utl_smtp.permanent_error then
utl_smtp.quit(c);
raise;
when others then
raise;
end send;
end sendmail;
You can use the HTML tags in the p_body parameter as per your format.
Thanks,
Gaurav
Friday, October 22
How to upload excel to the database table
Hi,
We create an item type for file Upload and the coding is as under :
Suppose you want to insert the data into table directly from excel so create a EO based VO.
handle the click og Go button in Controller:
We create an item type for file Upload and the coding is as under :
Suppose you want to insert the data into table directly from excel so create a EO based VO.
handle the click og Go button in Controller:
OAApplicationModule am = (OAApplicationModule) pageContext.getApplicationModule(webBean);
OAViewObjectImpl vo = (OAViewObjectImpl) am.findViewObject("TempVO1");
if (pageContext.getParameter("Go")!=null)
{
DataObject fileUploadData =(DataObject)pageContext.getNamedDataObject("FileUploadItem");
String fileName = null;
String contentType = null;
Long fileSize = null;
Integer fileType = new Integer(6);
BlobDomain uploadedByteStream = null;
BufferedReader in = null;
try
{
fileName = (String)fileUploadData.selectValue(null, "UPLOAD_FILE_NAME");
contentType =(String)fileUploadData.selectValue(null, "UPLOAD_FILE_MIME_TYPE");
uploadedByteStream = (BlobDomain)fileUploadData.selectValue(null, fileName);
in = new BufferedReader(new InputStreamReader(uploadedByteStream.getBinaryStream()));
fileSize = new Long(uploadedByteStream.getLength());
System.out.println("fileSize : "+fileSize);
}
catch(NullPointerException ex)
{
throw new OAException("Please Select a File to Upload", OAException.ERROR);
}
try
{
//Open the CSV file for reading
String lineReader="";
long t =0;
String[] linetext;
while (((lineReader = in.readLine()) !=null) )
{
//Split the deliminated data and
if (lineReader.trim().length()>0)
{
System.out.println("lineReader : "+lineReader.length());
linetext = lineReader.split(",");
t++;
//Print the current line being
System.out.println(t + " - " +
linetext[0].trim() + " - " + linetext[1].trim() + " - " +
linetext[2].trim() + " - " + linetext[3].trim() + " - " +
linetext[4].trim() + " - " + linetext[5].trim() );
for(Row row = (Row)vo.first(); row!= null; row = (Row)vo.next())
{
if(linetext[0].trim().equals(row.getAttribute("EmpId")))
{
row.setAttribute("EmpName",linetext[1].trim());
row.setAttribute("Department",linetext[2].trim());
row.setAttribute("Designation",linetext[3].trim());
row.setAttribute("Manager",linetext[4].trim());
row.setAttribute("Residence",linetext[5].trim());
}
}
}
}
}
catch (IOException e)
{
throw new OAException(e.getMessage(),OAException.ERROR);
}
am.getTransaction().commit();
throw new OAException("File Uploaded SuccessFully!!!",OAException.CONFIRMATION);
}
}
Thanks,
Gaurav
Subscribe to:
Posts (Atom)